I know you can use various addins (like Case Extrude Rooms to 3D Mass) to make a form out of a Room element in Revit. However, there is a vanilla Autodesk way you could go about this:

  1. Export a Revit view to Navisworks with all of the Room-related export boxes ticked in the Navisworks Exporter addin
  2. Open / append the NWC in Navisworks
  3. Turn off everything except the Room objects that the Navisworks Exporter created
  4. Export the scene to FBX, convert to DWG, import it to a family, place that family back in the project (using parts of this workflow). Use origin-to-origin linking to get things right.

You could then use the Room 3D element “family” in an Interference Check, to determine what elements exist in Rooms (this would only work for Categories that support Interference Check in Revit).

Have you ever had a large facility, divided up into Levels and Sectors, and you wanted to find out in which zone a particular item or group of items exist?

In Navisworks, this can be a real pain because guess what – Navisworks doesn’t know about “stuff”, only about surfaces. In other words, if an item is fully contained within the volume of another item, this doesn’t show up as a clash. Theoretically, you could have a facility full of pipes that are clashing with ducts, and as long as the pipes run perfectly inside the shell of the duct, the clash won’t show in Navisworks. Scared?

Interestingly, Revit Interference Check does know about stuff. It can find clashes of one item inside another, such as:

So, if you have access to the Revit models of items that you want to clash to see if any are “inside” others, Revit Interference Check can do that for you.

Now, before I move on… I did investigate some options for forcing Navisworks to do this type of detection for me. My first idea was setting the clash detection tolerance to a negative. In essence, these moves things around to see if they will hit each other. Set it to 500mm and it will find items that are 499mm apart. But it was too heavy handed to find what I wanted. So my next idea was to slice up the model in Revit before exporting to Navisworks and detect that way (basically giving me more surfaces to work with). Here are the steps I took:

  1. Modelled the sector level zones as Floor elements in Revit
  2. Made the Floor have a new layer at every 100mm (ie. 45 layers for 4500mm floor to floor)
  3. Divided all these Floors into Parts – meaning I had slices at every 100mm
  4. Exported the 3D view from Revit to DWF with Parts Visibility set to show both– in this way, you get both the original Floor and the resulting Parts. Using the Convert Parts option in Navisworks Exporter gives you one or the other, but not both… I imported this 3D DWF to Navisworks and used it for clash detection.
  5. Using some search sets, I was able to use the Part “slices” to discover where items existed, but I couldn’t easily relate that back to the original Floor element (which had a manually input property for the Sector in the Comments field in Revit). An addin that drives parameters from original Floors into their child Parts would help here…

So, back to treasure hunting in Revit… If you have access to the Revit models (or IFC) of the items you want to check, it is quite easy:

  1. Link the models together
  2. Use Interference Check to determine which items are affected (see image above). Only certain categories are candidates for Interference Check, check the last column here.
  3. Export the HTML report from Interference Check dialog
  4. Open in Excel
  5. Use a LEFT formula and Remove Duplicates to grab list of Element Ids
  6. Use CONCATENATE to put commas in
  7. Use Select by Id in Revit, and the string from 5) to select the affected elements in Revit
  8. Modify some property to allow for filtering. In my case, I made a “Tags” property so that I can search for “contains” in a Schedule and selectively show items. 

Here are some screenshots of those steps.

Another way to shortcut some of the above would be to drive different Type Names into each floor based on the two sector-level parameters (using an addin). In the Interference results, you can immediately see:
Workset
Category
Type
Element ID

At least then you wouldn’t have to go through the above Excel steps just to get the results into a Revit selection set!

To combine some workflows, if you don’t have access to the Revit model and you want to do this type of “container clashing”:

  1. Use the FBX to DWG workflow to get your items from Navisworks
  2. New Family – Generic Model
  3. Import DWG – Origin to Origin 
  4. Also place something at 0,0,0 (could use DWG origin locator for this)
  5. Save / Load family into Project
  6. Place the family at 0,0,0 (could use DWG origin locator for this)
  7. Use this Generic Model family as one of the parties in your Interference Check
  8. If you go this route (FBX-DWG-family), it will take super long to do the Check – go grab a drink or do something else for a bit
    (note: one nice thing about this is that the family is clashed as one single item – meaning the Interference Check results are quite clean)

Remember you can use “Show Last Report” on the Ribbon to get the last interference check results back.

By now, most of us are using Navisworks for some sort of aggregation, model checking or clashing.  So why would anyone want to use Revit Inteference Check (on the Collaborate tab, Coordinate panel)?  Basically, because its “in-canvas” and doesn’t require workflow-disconnect (export NWC, find Clash, Switchback, modify, refresh NWC).

Instead, we can run a clash report within Revit, close the dialog, fix the problem, then refresh the report.  Much easier.

For one recent Basement Carpark Design, we already had Parking families set out, and the Structural model linked in.  All I had to do was edit the Parking family, add a Shared Nested family of suitable Category (in my case, Electrical Equipment), run the Interference Check, fix or mark up the problems, and then switch “off” the shared nested component (using a visibility switch on the shared nested component).  Quick and easy.

Obviously, there is a lot it can’t do (especially compared to Navis), but some things it can do nicely.  Read on for some Q and A:

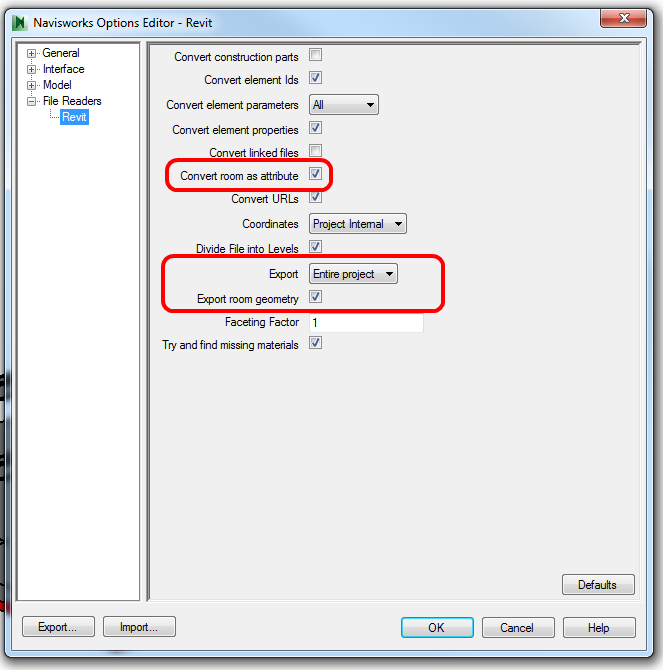
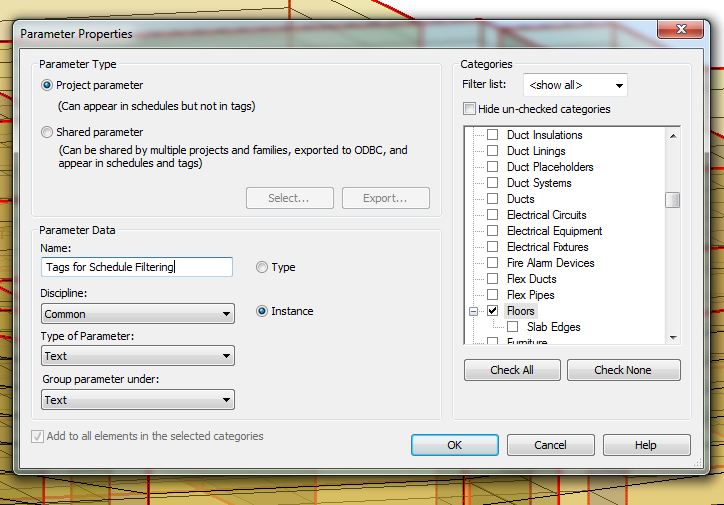
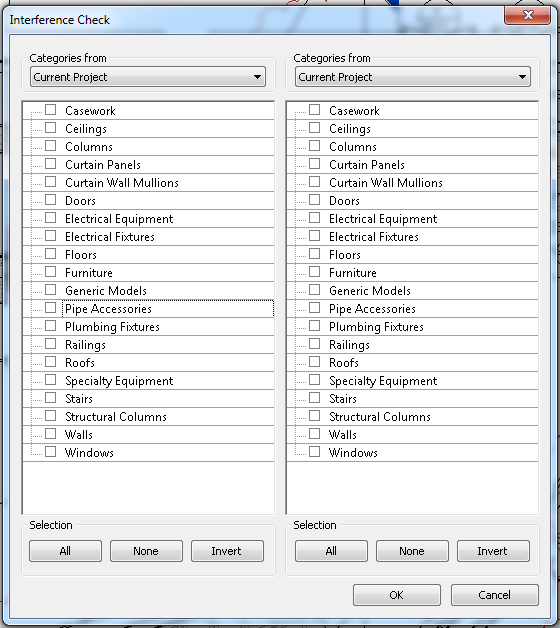
Is there a limit to the Categories you can use in an Interference Check?
Yes, see image below

Can you clash against a Shared Nested form of one of the above Categories?
Yes!

Can you clash against a Linked file in Revit?
Yes, of course – the above Category limitation still applies

Can you clash against selected objects?
If you select objects before starting the command, only items matching above Category limitations and present in the selection will be available as a tick box.

Will collinear 3D faces trigger a Interference in Revit?
Unfortunately yes.  You can work around this by offsetting one of the forms by 1 or 2mm to “ignore” those clashes.

Will an invisible (unchecked) Extrusion or Family be included in the Interference Check?
No

Will an item that is completely transparent (either based on a View setting or Material setting) be included in the Interference Check?
Yes

Can you clash against a Void form?
Yes

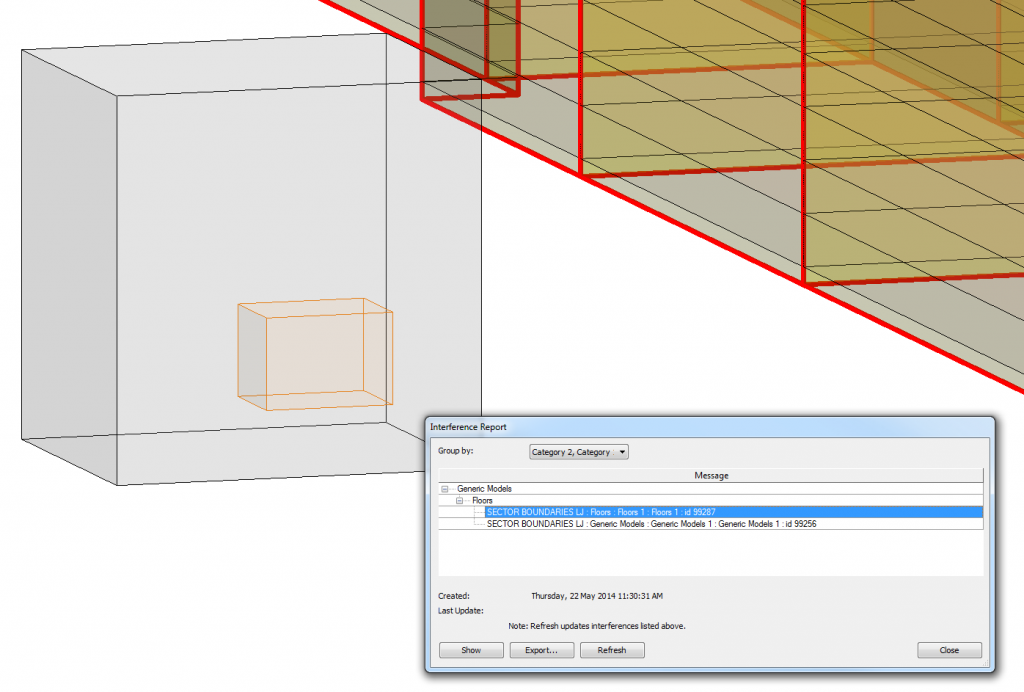
While you can’t “Save” a Search Set, you can Refresh your previous Interference Check in Revit.  Just do this:
Interference Check – Show Last Report – Click Refresh
Note: pressing “Refresh” does not re-run the Check, it just re-checks the things already in the list to see if any have been fixed.

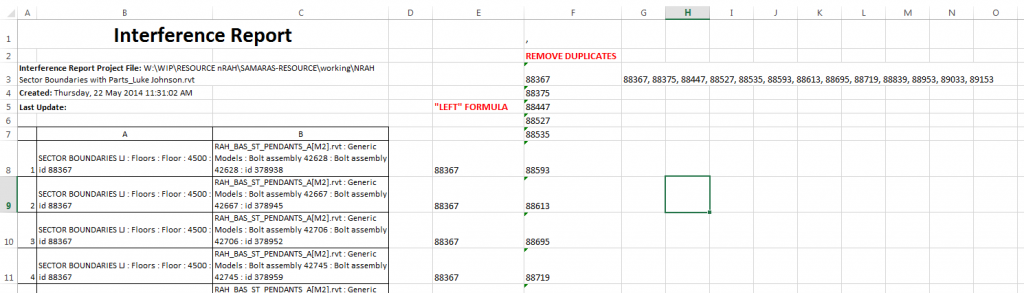
To make “finding” the clashes quicker after the report is run – open a few key views first.  As these are in memory, when you click “Show” on an item in the report, Revit will look in these open views first.

Helping google:
Revit interference checking shared nested

A recent article on gostructural.com describes the basic tools used for coordination between disciplines in Revit.  Its worth a read for “Revit coordination beginners.” 

It covers the three primary coordination tools in vanilla Revit:

  • Copy / Monitor
  • Coordination Review
  • Interference Check

Here are a few little gems from the article:
The elements that can be included in the copy/monitor process include: Levels, Grids, Columns, Walls, Floors, and Openings

Coordination Review actions:

  • Postpone: take no action on the element
  • Reject: makes no change to the element in the host file
  • Accept Difference: Accepts that a change has been made between the monitored elements but no change is needed between the elements
  • Modify/Rename/Move: If the element is renamed/moved, this option will rename/move the element to match the monitored element
  • via
    http://www.gostructural.com/magazine-article-gostructural.com-6-2013-coordinating_your_autodesk_revit_structure_project_with_other_revit_disciplines-9339.html

    Heads-up: Daniel Hughes on LinkedIn