Free Standards Guide – Energy Efficiency

This guide provides information on Standards and Certification schemes relating to energy efficiency and climate change and covers topics such as solar panel systems, energy efficient products, nuclear energy, wind turbines and more.

Download here: Guide to Standards – Energy Efficiency

via
SAI Global

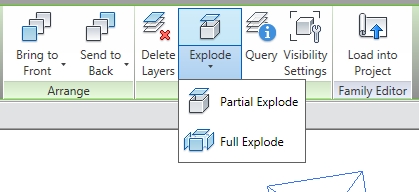
After selecting an Import instance, you can choose to Full Explode or Partial Explode.  Most users realise that exploding is a bad idea, and it can get very messy.  In fact, a number of experienced Revit users feel that you should NEVER import a CAD instance, always use Link.
In any case, the main difference between a full explode and a partial is this:
  • Full Explode will explode all blocks and XREFs into their most basic elements, such as lines and arcs.
  • Partial Explode will explode the instance into its nested blocks and XREFs.  You can use Partial Explode again to explode these blocks into their nested blocks, and so on, until you get down to the lines and arcs etc.
You can explode (disassemble) the import symbol into its next highest level elements: nested import symbols. This is a partial explode. A partial explode of an import symbol yields more import symbols, which, in turn, can be exploded into either elements or other import symbols. This is analogous to exploding in AutoCAD with nested xrefs and blocks. For example, you explode an xref into other xrefs and blocks. Those xrefs and blocks can, in turn, be exploded into more blocks and xrefs.
You can also explode the import symbol immediately into Revit text, curves, lines, and filled regions. This is a full explode.

Wouldn’t it be nice if we got an update version of the Revit Families Guide?
Well, sadly, we don’t have it yet.


You can still access the 2010 version here and the 2009 version here.

I don’t know about you, but I would love an updated Families Guide for 2011.

Some of the information in this guide is invaluable. I have actually requested that Autodesk put together a comprehensive guide relating to Revit Categories (SR# 1-9298685321 – The help file does not describe the unique properties of each Category).

Here is an example of the information in the 2010 guide (this is copyright to Autodesk obviously):

EDIT In Revit 2012 and newer, the quickest way to identify paint is to use the Remove Paint tool.  This does not load the Material selection panel, and will thus be faster.  Also, switch 3D view to wireframe with Remove Paint to globally scan the project with your cursor for painted surfaces…

To find out what material is currently painted onto a surface, simply start the ‘Paint’ tool, then Tab select the surface (face region).

Revit will produce a tooltip showing the currently painted material, and this will also show up in the status bar at the bottom of the screen.

Let’s say you have hundreds of views in a Project, with some customised view sorting. How do you delete a view that you have open, without having to find it in the Project Browser?

Simply right-click in the view and go to one of the referring views (Find Referring Views). The view you were in previously will now be ‘selected’ and you can just press Delete to delete it!

Note: I recently requested that the Revit team provide a ‘Find in Project Browser’ command to quickly browse to a view (or family or group, for that matter) in the Project Browser.

Here is a brief how-to on creating a large, high resolution rendered Revit walkthrough (or sun study) and then subsequently compressing and uploading it to Youtube.

  1. Setup your walkthrough view.
  2. In Revit, Export – Walkthrough and divide the total frame count of the animation into parts that have a manageable number of frames (I recommend 100).
  3. Do this for each part of the Walkthrough (ie. create files with frames 1-100.avi, then 101-200.avi, 201-300.avi etc). Use ‘Full Frames (uncompressed)’ when creating these parts.
  4. Use VirtualDub to join the parts together. In VirtualDub, open the first part. Press Ctrl-Right arrow (this takes you to the end of the file), then go File – Append AVI Segment… and choose the next part. Do this however many times is need to append all parts to the original file.
  5. In VirtualDub, go to Video – Compression and I recommend using the ‘Cinepak Codec by Radius’ if you have it. Quality = 100.
  6. In VirtualDub, go to Audio and choose ‘No Audio’
  7. Choose Video – Full Processing Mode
  8. Now go File – Save as AVI and create your combined and partly compressed AVI file.
  9. Open Windows Movie Maker. Import the combined file into the collections.
  10. Drag the file into the storyboard at the bottom.
  11. Go to File – Publish Movie. Choose ‘This computer’ and click Next. Choose a filename and location and click Next.
  12. I recommend choosing ‘Best quality for playback on my computer’. This should reduce the file to a manageable size.
  13. Now, open your browser and login to your Youtube account. Choose ‘Upload’.
  14. Select the compressed video you have created, and upload it. This may take a while, so just wait patiently (or do some other work!)
  15. Once uploaded, you can now share the link code with Clients or others who may like to view the animation.

Below is an example of a 1000 frame rendered animation we recently produced at Dimond Architects. It started out at about 1.2 gb, then VirtualDub compressed it to around 225 mb, then Movie Maker compressed it to about 20 mb.It took about a week for one workstation to produce this:

Feel free to share links to any files you upload to Youtube by commenting on this blog post.