I’m very interested in where Paul is heading with this: The QR Code pictured below, when scanned, will pull up the website, triggering the data in it to be sent to Revit. Picture a QR Code with info on a HVAC Unit, you scan it and the data is passed to Revit for when it was installed or serviced.
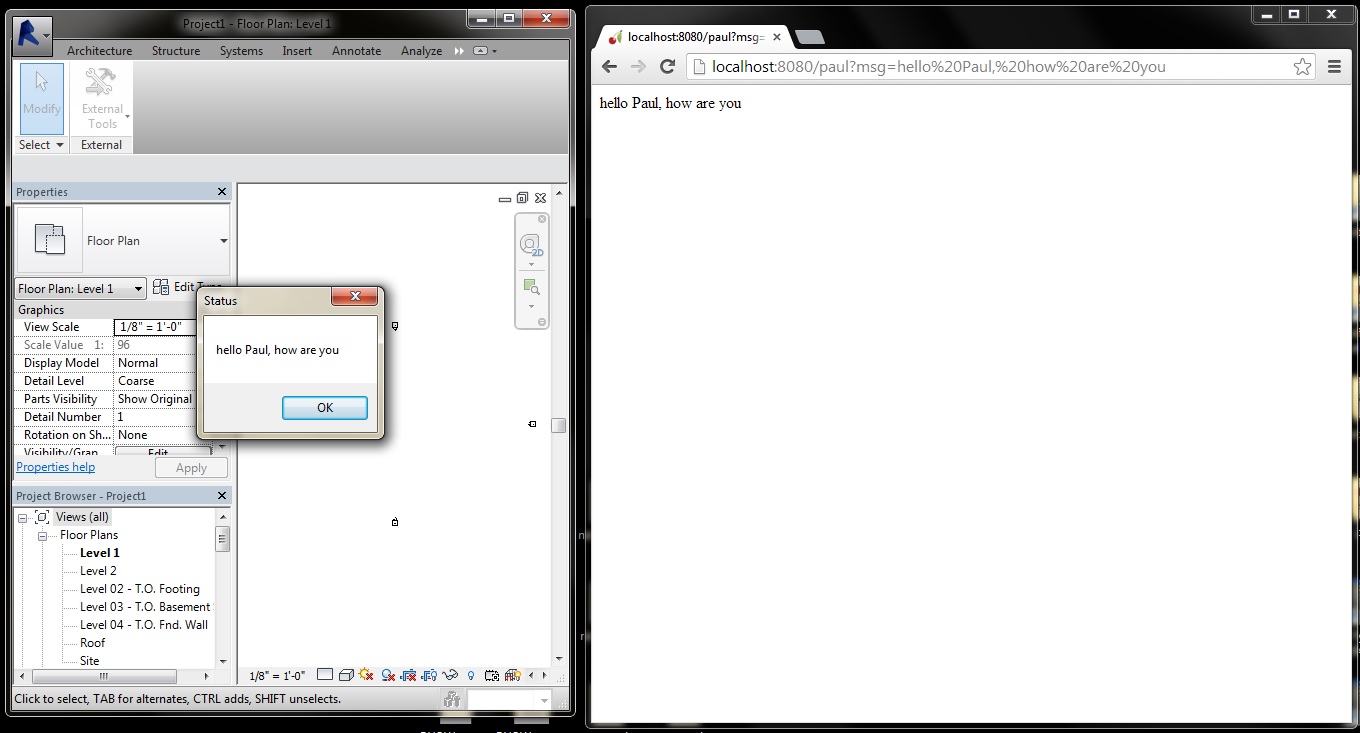
Sending Data in a URL to Revit. Data can be parsed to update parameters of object.
This project fits into the larger scope of connecting our desktop Revit content creation with actual site information and making all of this accessible to entire teams on the cloud.
EDIT: Paul provided the code in the comments below: I found the code for this example. It is not pretty, but should be very simple. There are two files: the Revit Plugin and the Website.
REVIT PLUGIN using System; using System.Collections.Generic; using System.Linq; using System.Text; using Autodesk.Revit.DB; using Autodesk.Revit.DB.Architecture; using Autodesk.Revit.UI; using Autodesk.Revit.UI.Selection; using Autodesk.Revit.ApplicationServices; using Autodesk.Revit.Attributes; using RabbitMQ.Client;
[TransactionAttribute(TransactionMode.Manual)] [RegenerationAttribute(RegenerationOption.Manual)] public class RevitRabbit : IExternalCommand { public Result Execute( ExternalCommandData commandData, ref string message, ElementSet elements) {
string msg = null; var connectionFactory = new ConnectionFactory(); IConnection connection = connectionFactory.CreateConnection(); IModel channel = connection.CreateModel();
BasicGetResult result = channel.BasicGet(“hello”, true); if (result != null) { msg = Encoding.UTF8.GetString(result.Body); System.Windows.Forms.MessageBox.Show(msg, “Status”);
I found the code for this example. It is not pretty, but should be very simple. There are two files: the Revit Plugin and the Website. REVIT PLUGINusing System;using System.Collections.Generic;using System.Linq;using System.Text;using Autodesk.Revit.DB;using Autodesk.Revit.DB.Architecture;using Autodesk.Revit.UI;using Autodesk.Revit.UI.Selection;using Autodesk.Revit.ApplicationServices;using Autodesk.Revit.Attributes;using RabbitMQ.Client; [TransactionAttribute(TransactionMode.Manual)][RegenerationAttribute(RegenerationOption.Manual)]public class RevitRabbit : IExternalCommand{ public Result Execute( ExternalCommandData commandData, ref string message, ElementSet elements) { string msg = null; var connectionFactory = new ConnectionFactory(); IConnection connection = connectionFactory.CreateConnection(); IModel channel = connection.CreateModel(); BasicGetResult result = channel.BasicGet("hello", true); if (result != null) { msg = Encoding.UTF8.GetString(result.Body); System.Windows.Forms.MessageBox.Show(msg, "Status"); } else { System.Windows.Forms.MessageBox.Show("No Messages Waiting.", "Status"); } return Result.Succeeded; }} WEBSITEimport cherrypyimport… Read more »


Thanks for posting this. It is an idea that I wish I could spend more time building. Hopefully one of your readers could pickup where I left off.
I found the code for this example. It is not pretty, but should be very simple. There are two files: the Revit Plugin and the Website. REVIT PLUGINusing System;using System.Collections.Generic;using System.Linq;using System.Text;using Autodesk.Revit.DB;using Autodesk.Revit.DB.Architecture;using Autodesk.Revit.UI;using Autodesk.Revit.UI.Selection;using Autodesk.Revit.ApplicationServices;using Autodesk.Revit.Attributes;using RabbitMQ.Client; [TransactionAttribute(TransactionMode.Manual)][RegenerationAttribute(RegenerationOption.Manual)]public class RevitRabbit : IExternalCommand{ public Result Execute( ExternalCommandData commandData, ref string message, ElementSet elements) { string msg = null; var connectionFactory = new ConnectionFactory(); IConnection connection = connectionFactory.CreateConnection(); IModel channel = connection.CreateModel(); BasicGetResult result = channel.BasicGet("hello", true); if (result != null) { msg = Encoding.UTF8.GetString(result.Body); System.Windows.Forms.MessageBox.Show(msg, "Status"); } else { System.Windows.Forms.MessageBox.Show("No Messages Waiting.", "Status"); } return Result.Succeeded; }} WEBSITEimport cherrypyimport… Read more »
Thanks Paul!