
Good post over at Andekan on Revit Materials in 2013 – I have reposted three things I found particularly insightful below.
First of all – a slight correction. The Andekan post states that:
You can’t open the asset browser unless you open a project material in the material editor.
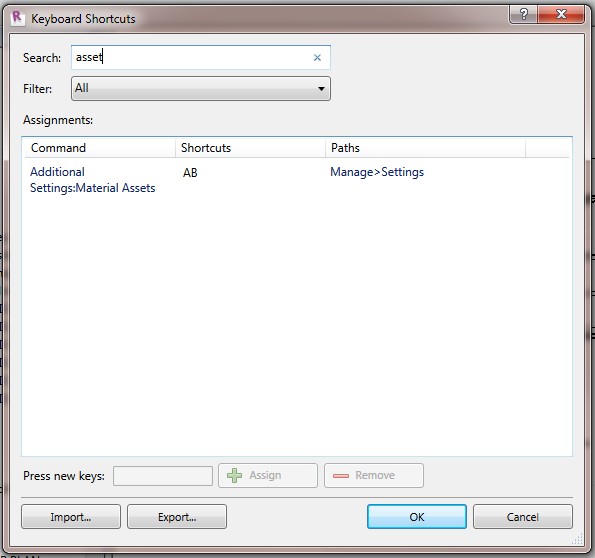
This is actually not true. You can open the Asset Editor and the Asset Browser without opening Materials. Just set a Keyboard Shortcut to Additional Settings:Material Assets. This will open the Asset Editor. Then click the ‘lines’ icon to open the Asset Browser. Its kinda messed up, but you can do it.
Now, on to some good stuff from the post:
Entire Materials can live in .adsklib files:
you can take a whole material from inside your project (called “In Document” materials), including all of its different property sets (now called “Assets”), and add it to any number of external libraries that you create. You can also add materials from one library to another. Libraries that you create are stored as standalone .adsklib files, just like the “materials” libraries (read “appearance properties”) of prior versions, so they can be ported and shared between installations with ease.
.adsklibs can contain Assets AND Materials
Libraries
These are groups of materials and/or assets that exist outside of any particular project or family. They are saved as standalone .adsklib files, and it’s important to note that a single library can contain both materials and assets. This makes perfect sense: if materials are made up of different assets, then a “materials” library must somehow contain appearance, physical, and thermal assets as well.
How to update and maintain .adsklib Libraries
5. You can only edit materials and assets that are inside of a project. In a library, you are limited to viewing the names of materials and assets, and to performing basic functions like Rename or Delete. If you want to edit a material or asset that’s in one of your libraries, you have to: 1) bring it into a project, 2) make your edits, then 3) add it back into the library to overwrite the original version, and finally 4) remove the copy that’s inside the project (if you don’t want it there).
Read more / via
Andekan � Blog
 continues...")


