Sometimes you may have trouble using a DWG that contains ‘points’ to create a Revit topography.

There are two main ways around this.

METHOD 1
Here is a LISP routine to export points in a DWG to CSV file:
http://www.revitcity.com/forum_files/69930_RegCoorPointsCsv.lsp 

These points can then be imported when making a Revit topography by selecting ‘Specify Points File’ on the Ribbon.

via
RevitCity.com | Topo point does not import?

METHOD 2
Alternatively, you can Replace the points with some other object that Revit will make use of more easily (for instance, a block with some very short lines).  To do this, use the ‘RP’ LISP routine from the following post:
Re: Replace point with block/object – Autodesk Discussion Groups

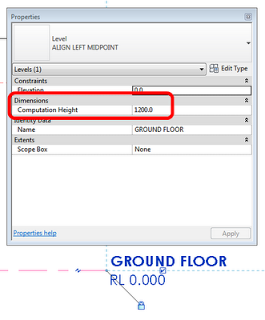
I can’t believe I had not come across this change until today. In Revit 2012, the Room Computation Height is no longer a Type Property of the Level – it is now an Instance Property.

Some of the impacts of this when upgrading are described in the Revitez post below:

This eliminates the need to create a kind of different level for adjusting the heights of the different calculation levels.

When your old projects, where you took the trouble to create these types of additional levels, your types still exist, but they no longer control the height and therefore not used to anything if their purpose was the control of this value.

The value is copied into the parameter of occurrence. All is well, just be careful if you need to change height calculation, there is no need to change the type as you did in the 2011 version, this will have absolutely no effect.

via
Google Translate of Revitez post

I received this comment to one of my posts:

…Being new to Revit (2011) is there a way to locate newly created views in the project browser? Or do a search? Or am i stuck using filters? 
Comment link

Here are a few different ideas that may assist:

  1. Remove all filters / folders from the Project Browser (so that all views are grouped together).  When you make a new view, Revit ‘activates’ it (and makes it bold), so you can just scroll down through all the views until you see one with a bold name.
  2. Set up a Quick Filter parameter.  Let’s say it is called ‘Job Task’ or something.  Add this parameter to all views.  Then, Filter your Project Browser by ONLY that property.  When you make a new view, set the ‘Job Task’ parameter to something – and then you will see the view appear under that folder.  I currently use this method on a large project to divide views logically by the actual Revit work that they are associated with.

  3. Make a View List (Schedule – View List) that includes the View Name property.  Now, filter by View Name – contains – whatever text you are searching for.  You have created a ‘View Search Tool’.  It’s not perfect, but it does work.
  4. Set up your Project Browser folders and your Default View Templates such that you ‘know’ which folder a particular View type will end up in.  This kinda works for new Views, not so much when ‘Duplicating’ a view.
  5. If you do ‘Duplicate’ a view, look for ‘Copy of’.  Annoyingly, Revit hasn’t adopted the Vista / Windows 7 convention of appending ‘- Copy’ to copies of things.  This has been on my wish list for a while!

Hope some of these ideas help you newer users to find those sneaky new Views!

A recent post over at Revit Scratchpad deals with the issues of ‘user expectations’ and the importance of setting up a Revit project correctly from the beginning.  Check it out:


Revit can be amazing at doing complex tasks and yet sometimes it can seem almost impossible to get it to do something that the user considers a simple task.

In a recent such case and after explaining an open-heart surgery procedure for a live Revit project a colleague of mine summed up the whole thing in a nutshell. He said that it reminded him of doing a slider puzzle…

I guess the lesson is to try and start with the end goal in mind. Please dont just jump in…

via
Revit Scratchpad: Do you find Revit puzzling?

I was trying to delete a view today, and I got this Error:
The Revision of this Revision Cloud has been issued.  Deletion of this Revision Cloud is prohibited.

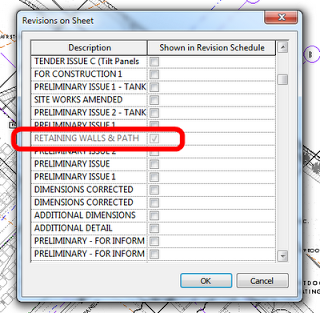
So, obviously there are some Revision Clouds, marked as ‘Issued’, in this view.  But how do I find out which ones are on there?  There is no ‘Revisions on Sheet’ button because this view is no longer on a sheet…aha, got it!

  1. Make a new sheet
  2. Place the ‘orphaned’ view on the sheet
  3. Now you have access to the ‘Revision on Sheet’ button from the Sheet View
  4. The Revision Clouds that exist in that view will be ‘greyed’ out in the dialog box.

To delete the view:
  1. Un-issue the selected Revision/s
  2. Find the Revision Cloud
  3. Delete the Clouds
  4. Delete the View

PS – If your sheet family has a Revision Schedule on it, this should also show the Revision Clouds that are in the view…

I find the Error Report – Warning – Select by ID process to be a little unwieldy in Revit (at the moment).

Here is a little process that may speed things up for you when reviewing a Error Report in Revit.

  1. Save Error Report to HTML
  2. Open HTML Error Report
  3. Copy data to Excel spreadsheet.
  4. Use RIGHT formula to extract only the id number to a new column.
    eg =RIGHT(C3,7)
  5. Copy the cell containing the id number to the ‘Select Elements by ID’ dialog in Revit.

Remember the GetLevel add-in? I previously posted about it at What Level is that on? and Find Elements Associated with a Particular Level.

Well, the guy behind GetLevel, Steve Faust, has just released version 1.0 of a new add-in called Selection Master – and it is very cool.  I was esteemed enough to be part of the beta project, so I can speak from experience.  It’s the selection tool that you have been waiting for.

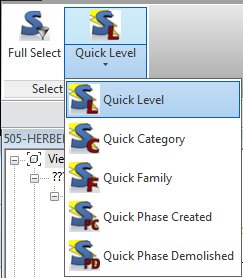
You basically get two main tools on the Ribbon – a Full Select button, which opens a well endowed selection dialog box, and a series of Quick Select tools.  To use these, you just pick an Element – Quick Select Level – and it will select all elements on the level that the selected object is associated with.  Cool, huh?

Selection Master supports 5 types of filters:

  • Level
    • Level filters recognize level parameter, work plane, reference level, and schedule level so all offset beams, etc. are included.
  • Family
  • Category
  • Phase Created
  • Phase Demolished

Selection Master - FiltersThe Selection Master full interface can be used to create filters based on any of these properties or combine as many filters as desired to refine the set. Find all first floor walls created in phase 2 or simply find every element related to the second floor level.

At just $25 for a seat, or $400 for an Enterprise license (both are Subscription based), don’t you think it’s worth a try?

It currently supports Revit 2011 and Revit 2012.

Read more at
Selection Master – Home

Martijn de Riet has pointed out something very useful when you are trying to use a Calculated Value to pull together a bunch of similar-but-different parameters.  If you come across an error, don’t forget about the ‘Add to all elements in the selected categories’ check box in the Parameter Properties dialog.

The Problem:
When you create the first (window) schedule you’ll notice a whole bunch of width parameters, all referencing the total width of different windows (fig 1)
After creating the schedule you figure: let’s create a “scheduled width” parameter which adds up all those separate width parameters. This way you can clean up your schedule (fig 2). Only to find that it won’t calculate. In this case, the family “ontwerpraam doesn’t have the parameter “breedte_vo” so in the schedule it returns no value. Therefor, the total cannot be calculated (fig 3).

The Solution:
Open the schedule properties, go to the Fields Tab, select the parameter causing problems and click Edit.
In the Parameter Properties, check the checkbox “Add to all elements in the selected category”, select the category “windows” and choose whether it should be an Instance or Type Parameter (fig 4).
The parameter is now accessible in the schedules, even with the families it’s not actually in. You can now fill in a value and the Scheduled Width parameter will calculate properly (fig 5). It will even show up in the family’s properties (fig 6).

The Original Forum Post:
Push parameters in the project environment

Thanks Martijn de Riet!!